245Instructions
Important
Read This Before Using Liquid Intelligence 245
For the best possible results when using Liquid Intelligence 245, we recommend thoroughly reviewing and following the detailed instructions provided. If there are any uncertainties, our dedicated technical support team is available seven days a week to assist you.
Our commitment to providing exceptional service includes offering personalised assistance via phone calls. If you’d like to discuss the technical and practical aspects of using Liquid Intelligence 245, please reach out to us. You’ll receive detailed support from our qualified technical staff, many of whom boast over 40 years of experience in the industry.
Ensuring success in resolving your head gasket issue is our foremost priority.
We are available on 1800 441 163 or 02 8188 2060 from 7am to 7pm seven days a week.
When Calling from Outside Australia:
From USA/Canada: 011 61 2 8188 2060
From UK/Europe: 00 61 2 8188 2060
From New Zealand: 00 61 2 8188 2060
All others countries:
Google your international dial code +61 2 8188 2060
You can also email Peter directly: peter@liquidintelligence.com.au
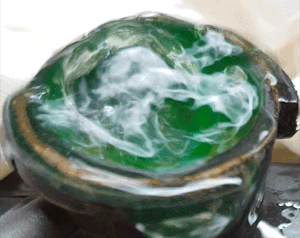
How to Decipher Radiator Bubbling Patterns to Gauge the Severity of a Blown Head Gasket; A Diagnostic Guide
To accurately gauge the severity of a head gasket breach and choose the appropriate repair method when using Liquid Intelligence 245; follow these steps:
Observation of Bubbling:
With the radiator cap removed, observe the radiator water for bubbling while the vehicle is running.
Run the vehicle to full operating temperature with the radiator cap off to ensure an unobstructed view of bubbling.
Identification of Bubbling:
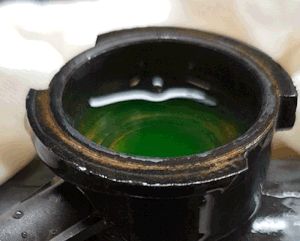
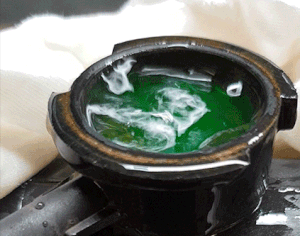
Continuous bubbling in your cooling system serves as a reliable indicator of a head gasket breach, typically located above a combustion chamber. The severity of the issue is directly proportional to both the frequency and size of the vapor bubbles observed during this process. Champagne-like bubbles may suggest a minor breach, while more vigorous, volcanic bubbling indicates a substantial and potentially severe breach.
For a visual reference, please review the attached images depicting three distinct scenarios of bubbling radiators. Evaluate the severity of your head gasket damage based on the observed bubbling patterns.
To effectively address your head gasket damage, it is crucial to choose one of the three recommended repair methods that best aligns with the specific degree of damage your vehicle has sustained. This decision should be guided by a careful consideration of the frequency and size of vapor bubbles present in your cooling system, as these directly correlate with the extent of your vehicle’s head gasket damage.
By identifying the severity of the issue through the bubbling characteristics and referencing the provided images, you can make an informed choice in selecting the most appropriate method for repairing your head gasket damage.
Key Features of Liquid Intelligence 245:
Innovative Flexible Seal Formulation of Liquid Intelligence 245:
The effectiveness of Liquid Intelligence 245 can be attributed to its exceptional formulation, distinguishing it from numerous comparable products found on the shelves of automotive retail part shops and supermarkets. In contrast to many budget retail head gasket repair additives that typically incorporate copper particles or plastic fibres in a sodium silicate solution, Liquid Intelligence 245 stands out as a superior choice. While sodium silicate-based products may serve as temporary solutions, the true differentiator lies in the durability of the repair rather than merely functional aspects. Liquid Intelligence 245 is not formulated as a short-term quick fix; rather, it is designed as a comprehensive solution for lasting and reliable repairs across a wide spectrum of head gasket damage issues.
Advantages Over Sodium Silicate:
Unlike sodium silicate, which transforms into a rigid, glass-like structure within the breach, our formulation maintains a semi-flexible nature. This crucial characteristic prevents the seal from shattering or disintegrating when subjected to varying expansion and contraction rates of dissimilar metals between the engine block and head. The innate flexibility and durability of our seal formulation significantly contribute to a lasting and reliable repair. In contrast to sodium silicate-based products that only provide temporary fixes, our formulation is engineered to deliver enduring results.
In summary, our innovative flexible seal formulation not only outperforms conventional sodium silicate repairs by effectively addressing head gasket issues but also ensures their long-lasting durability, setting it apart from the limitations of traditional, less robust retail alternatives.
How to Maximise the Full Potential of Your Head Gasket Repair by Initially Assessing and Selecting the Optimal Repair Method.
These are the three alternative methods recommended for repairing a head gasket breach using Liquid Intelligence 245. To effectively repair your head gasket damage, choose one of the three recommended methods that best aligns with your vehicle’s specific degree of damage. This choice can be guided by the frequency and size of vapor bubbles in your cooling system, which directly correlates with the extent of the vehicle’s head gasket damage.
- Method 1: This Method is Recommended for Repairing Very Small Pinhole Head Gasket Breaches.
 This method is specifically designed for addressing small pinhole head gasket breaches.
It is recommended for vehicles exhibiting champagne-like bubbles or fewer, particularly when the vehicle isn’t consistently overheating and remains drivable in most conditions. The approach involves adding Liquid Intelligence 245 to the car’s cooling system along with tap water, allowing the product to self-repair minor breaches during normal driving conditions. - Method 2: This Method is Recommended for Repairing Small to Medium Head Gasket Breaches.
 This method is specifically tailored to address MEDIUM-LARGE SIZED head gasket breaches. It is recommended for vehicles that display medium to large sized bubbles, especially those experiencing consistent overheating and being drivable only for very short distances without overheating. The process entails incorporating Liquid Intelligence 245 with Optimizer into the car’s cooling system along with tap water and following this detailed repair method.
 - Method 3: This Method is Recommended for Repairing Medium to Larger Breaches
 This method is specifically tailored to address MEDIUM-LARGE SIZED head gasket breaches. It is recommended for vehicles that display medium to large sized bubbles, especially those experiencing consistent overheating and being drivable only for very short distances without overheating. The process entails incorporating Liquid Intelligence 245 with Optimizer into the car’s cooling system along with tap water and following this detailed repair method.
Method 1:
Recommended for Repairing SMALL Pinhole Head Gasket Breaches
This method is specifically designed for addressing very small pinhole head gasket breaches. It is recommended for vehicles exhibiting champagne-like or slightly larger bubbles, particularly when the vehicle isn’t consistently overheating and remains drivable in most conditions. The approach involves adding Liquid Intelligence 245 to the car’s cooling system along with tap water, allowing the product to self-repair minor breaches during normal driving conditions.
Follow These Step-by-Step Preparation Methods:
1. Next Ensure the Cooling System is Glycol-Free: Confirm that the system is entirely free of glycol (antifreeze anti-boil coolant), as it can hinder the effectiveness of Liquid Intelligence 245.
2. Disconnect Radiator Hoses: Disconnect both the top and bottom radiator hoses. Flush water through the expansion bottle, radiator, and hoses to remove any remaining coolant. Also turn on the heater to empty the heater core, then turn it off to prevent the entry of any sealing product into the core.
3. Bottom Hose Flushing: Insert a garden hose into the bottom radiator hose to displace any residual coolant from the system.
This comprehensive flushing process ensures the removal of all coolant and prepares the cooling system for the optimal application of Liquid Intelligence 245. Next Prepare a Pre-Solution of Liquid Intelligence 245:
Mixing Pre-Solution: Use Liquid Intelligence 245 at a ratio of 100ml per litre of the total cooling system capacity. As an example, if your total cooling system capacity is 5 litres, then the correct amount to use of Liquid Intelligence 245 would be 500mls.
In a clean bucket or container, add the correct amount of Liquid Intelligence 245. Then add equal amounts of tap water. Mix the Liquid Intelligence 245 and tap water together. When mixed it will go from being a thick solution into a thin solution.
Adding Pre-Solution: Pour this pre-solution into the empty cooling system of the vehicle.
Next Top Up the Cooling System with Tap Water:
Fill the cooling system until it’s full with tap water, then replace the radiator cap and top up through the expansion tank if necessary. Then replace the expansion tank cap.
Start the Vehicle and Idle:
Start the vehicle and let it idle it up to normal running temperature to allow the thermostat to open. To confirm whether the thermostat has opened, you can check the temperature of the top and bottom radiator hoses. If both hoses exhibit a similar temperature, it indicates that the thermostat has opened, allowing the pre-solution of Liquid Intelligence 245 to mix effectively with the water in the cooling system. This uniformity of the cooling system temperature is a reliable indicator of proper thermostat function and the correct pre-solution’s dispersion.
Once at temperature, turn off the vehicle and let it cool for approximately one hour.
Drive the Vehicle:
Drive the vehicle under normal conditions for a week or 10 days while closely monitoring for any bubbling in the radiator. While the vehicle is running, the combustion chamber with the breach pressurizes the cooling system, diverting the liquid away from the breach and preventing it from entering.
Once the vehicle is turned off at its destination, there is a build-up of vapor pressure in the cooling system. The synergy of heightened vapor pressure and heat efficiently propels the water and sealing additives into the breach. Typically located above or around a combustion chamber, the breach’s internal temperature will have exceeded 100°C at this point. This causes the water content inside the breach to evaporate, leaving concentrated chemicals behind. The ensuing heat and pressure chemical reaction transforms the solution into a solid seal, effectively plugging the breach.
Check for Bubbling:
After the engine has cooled down, inspect the radiator for any signs of bubbling. If no bubbling is evident, it is likely that the breach has been successfully repaired. In the case of reduced but lingering bubbling, continue repeating the process until the bubbling ceases entirely.
Reintroduce Coolant:
Reintroduce the coolant into the cooling system. Please note: it’s crucial not to rush the removal of the sealing additives; allow sufficient time for a thorough evaluation of the repair’s success. A few weeks of regular driving without the recurrence of symptoms serves as a strong indicator of a long-term successful repair.
Which Coolant Will Give You the Best Chance of Maintaining Your Head Gasket Repair?
Many people suspect that their head gasket damage is a result of overheating, which can be the case. However, it’s often a consequence of years of neglect in the cooling system, especially if the vehicle has been using only water or low glycol coolants for an extended period. Low or no glycol coolants can lead to cavitation erosion and corrosion, gradually eroding and compromising the integrity of the head gasket. This erosion allows combustion gas to leak into the cooling system, resulting in overheating issues.
Liquid Intelligence 245 Blown Head Gasket Solution is designed to repair such damage. However, without x-ray vision, it’s impossible to rule out the presence of additional damage in other areas of the head gasket. Consequently, it’s quite common to experience the development of another head gasket breach shortly after fixing one.
To address this, we strongly recommend considering the use of our Liquid Intelligence 500 Coolant after repairing the head gasket breach. Specifically formulated to eliminate cavitation erosion, this coolant’s unique attributes prevent other areas with head gasket damage from worsening and causing future problems. It becomes an essential component of the cooling system’s long-term restoration, enhancing the longevity of the 245-repair for years to come.
Method 2: This Method is Recommended for Repairing SMALL – MEDIUM Head Gasket Breaches.
This method is specifically designed for addressing small to medium head gasket breaches. It is recommended for vehicles exhibiting champagne to medium bubbles, particularly when the vehicle isn’t consistently overheating and remains drivable in most light traffic conditions.
The approach involves adding Liquid Intelligence 245 with Optimiser to the car’s cooling system along with tap water, and follow this detailed repair method.
Follow These Step-by-Step Preparation Methods:
1. Next ensure that the cooling system is glycol free. Confirm that the entire system is entirely free of glycol (anti-freeze anti-boil coolant) as it can hinder the effectiveness of Liquid Intelligence 245.
2. Disconnect radiator hoses:Disconnect both the top and bottom radiator hoses. Flush water through the expansion bottle, radiator and hoses to remove any remaining coolant. Also turn on the heater to empty the heater core, then turn it off to prevent entry of any sealing product into the core.
3. Bottom Hose Flushing. Insert a garden hose into the bottom radiator hose to displace any residual coolant from the system.
This comprehensive flushing process ensures the removal of all coolant and prepares the cooling system for the optimal application of Liquid Intelligence 245.
Next Prepare a Pre-Solution of Liquid Intelligence 245:
Mixing Pre-Solution: Use Liquid Intelligence 245 at a ratio of 100ml per litre of the total cooling system capacity. As an example, if your total cooling system capacity is 5 litres, then the correct amount to use of Liquid Intelligence 245 would be 500mls.
In a clean bucket or container, add the correct amount of Liquid Intelligence 245. Then add equal amounts of tap water. Mix the Liquid Intelligence 245 and tap water together. When mixed, it will go from a thick solution into a thin solution.
Adding Pre-Solution: Pour this pre-solution into the empty cooling system of the vehicle.
Add Optimiser Powder:
Use the 100gram tube of Optimiser Powder at an estimated ratio of 10% of the total cooling system capacity. As an example, use one full tube of 243 Optimiser Powder (100grams) to treat ten litres of cooling system capacity.
With the radiator cap off and a garden hose in hand, fill the cooling system with water while tapping the required amount of powder into the stream of water.
Continue filling the cooling system after adding the Optimiser Powder until it reaches full capacity. Once filled, securely replace the radiator cap. If additional water is required, top up the system through the expansion tank and ensure the cap is replaced securely as well. However, if the vehicle only has a cap on the expansion bottle and not on the radiator use the method below.
Optimiser Powder Application for Vehicles with Expansion Bottle Caps and No Radiator Cap
For vehicles equipped with a radiator cap, administer the Optimiser Powder directly through the radiator.
If the vehicle is equipped solely with a cap on the expansion bottle and lacks one on the radiator, it is advisable to avoid introducing the Optimiser Powder through the expansion bottle. This is because the Optimiser Powder may not readily disperse into the cooling system through this method.
To effectively introduce the Optimiser Powder into the cooling system, begin by disconnecting the top radiator hose from the radiator, leaving it connected to the engine. Hold the disconnected radiator hose in a vertical position, and with a garden hose in hand, commence filling the cooling system with water. Simultaneously, dispense the required amount of powder into the radiator hose using the stream of water from the garden hose to ensure even distribution.
As the cooling system approaches full capacity, reconnect the radiator hose back onto the radiator. Finally, complete the process by topping up the cooling system through the expansion bottle. This method guarantees a thorough and effective introduction of the Optimiser Powder into the vehicle’s cooling system, particularly in cases where there is no cap on the radiator.
Start the Vehicle and Idle:
Start the vehicle and let it idle up to normal running temperature.
Confirm that the thermostat has opened, by feeling the temperature of the top and bottom radiator hoses. If both radiator hoses are a similar temperature, it indicates that the thermostat has opened, allowing the Liquid Intelligence 245 additive to mix effectively with the water in the cooling system. This uniformity in temperature is also reliable indicator of proper thermostat function.
After reaching normal running temperature (indicated by the centre position on the temperature gauge), turn off the vehicle, and allow the engine to cool for approximately one hour. The combination of heat and vapour pressure in the pressurised cooling system will now force the 245-sealing solution and Optimiser particles into the breach, allowing a partial seal to form and cure.
Execute this procedure six to eight times, allowing the engine to cool for an hour between each heat cycle. With each repetition, a small amount of the product will accumulate in the breach, gradually sealing it. If there is a reduction in bubbling but some still persists in the cooling system, repeat the process a few more times.
Then allow the engine to cool down, remove the radiator cap and inspect the radiator or expansion bottle for any signs of bubbling. If no bubbling is evident, it is likely that the breach has been successfully repaired.
In cases where there is a reduction in bubbling but it persists to some extent, continue repeating the heat cycle process until the bubbling ceases entirely.
Drive and Monitor:
After successfully completing the repair, resume driving the car as usual. Monitor the symptoms for a week or more to ensure they do not reoccur.
Once confident in the repair, perform a thorough flush to remove Liquid Intelligence 245 solution and Optimiser Powder from the cooling system.
Reintroduce Coolant:
Reintroduce the coolant into the cooling system. Please note: it’s crucial not to rush the removal of the sealing additives; allow sufficient time for a thorough evaluation of the repair’s success. A few weeks of regular driving without the recurrence of symptoms serves as a strong indicator of a long-term successful repair.
Which Coolant Will Give You the Best Chance of Maintaining Your Head Gasket Repair?
Many people suspect that their head gasket damage is a result of overheating, which can be the case. However, it’s often a consequence of years of neglect in the cooling system, especially if the vehicle has been using only water or low glycol coolants for an extended period. Low or no glycol coolants can lead to cavitation erosion and corrosion, gradually eroding and compromising the integrity of the head gasket. This erosion allows combustion gas to leak into the cooling system, resulting in overheating issues.
Liquid Intelligence 245 Blown Head Gasket Solution is designed to repair such damage. However, without x-ray vision, it’s impossible to rule out the presence of additional damage in other areas of the head gasket. Consequently, it’s quite common to experience the development of another head gasket breach shortly after fixing one.
To address this, we strongly recommend considering the use of our Liquid Intelligence 500 Coolant after repairing the head gasket breach. Specifically formulated to eliminate cavitation erosion, this coolant’s unique attributes prevent other areas with head gasket damage from worsening and causing future problems. It becomes an essential component of the cooling system’s long-term restoration, enhancing the longevity of the 245-repair for years to come.
Method 3: This Method is Recommended for Repairing MEDIUM – LARGE SIZED Head Gasket Breaches
This method is specifically tailored to address MEDIUM-SIZED head gasket breaches. It is recommended for vehicles that display medium sized bubbles, especially those experiencing consistent overheating and being drivable only for short distances without overheating.
The process entails incorporating Liquid Intelligence 245 with Optimizer into the car’s cooling system along with tap water and following this detailed repair method.
Follow These Step-by-Step Preparation Methods:
Identify the Breached Cylinder:
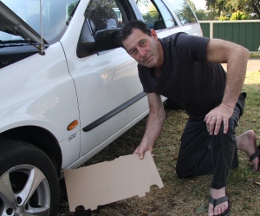
Begin by identifying the compromised combustion chamber. Remove the radiator cap or expansion bottle cap when the engine is cold and observe the radiator water for bubbling while the vehicle is running. Keep in mind that the thermostat, often located on the top radiator hose, may obstruct bubbling visibility. To address this, run the vehicle to full operating temperature with the radiator cap off, ensuring the thermostat opens, allowing an unobstructed view of bubbling. This ensures a clear path between the breach and the open radiator cap, making combustion gas bubbles visible in the radiator water.
Next, stop the engine and remove one spark plug or glow plug. Restart the engine to check if the bubbling in the radiator has ceased. If not, replace that spark plug or glow plug and proceed to remove the next spark plug or glow plug. Repeat this process until you identify the plug that stops the bubbling. This procedure will have effectively identified the breached combustion chamber.
After identifying the breached combustion chamber, leave the spark plug or glow plug removed.
1. Next Ensure the Cooling System is Glycol-Free: Confirm that the system is entirely free of glycol (antifreeze anti-boil coolant), as it can hinder the effectiveness of Liquid Intelligence 245.
2. Disconnect Radiator Hoses: Disconnect both the top and bottom radiator hoses. Flush water through the expansion bottle, radiator, and hoses to remove any remaining coolant. Also turn on the heater to empty the heater core, then turn it off to prevent the entry of any sealing product into the core.
3. Bottom Hose Flushing: Insert a garden hose into the bottom radiator hose to displace any residual coolant from the system.
This comprehensive flushing process ensures the removal of all coolant and prepares the cooling system for the optimal application of Liquid Intelligence 245.
Next, Prepare a Pre-Solution of Liquid Intelligence 245:
Mixing Pre-Solution: Use Liquid Intelligence 245 at a ratio of 100ml per litre of the total cooling system capacity. As an example, if your total cooling system capacity is 5 litres, then the correct amount to use of Liquid Intelligence 245 would be 500mls.
In a clean bucket or container, add the correct amount of Liquid Intelligence 245. Then add equal amounts of tap water. Mix the Liquid Intelligence 245 and tap water together. When mixed, it will go from a thick solution into a thin solution.
Adding Pre-Solution: Pour this pre-solution into the empty cooling system of the vehicle.
Add Optimiser Powder:
Use the 100gram tube of Optimiser Powder at an estimated ratio of 10% of the total cooling system capacity. As an example, use one full tube of 243 Optimiser Powder (100grams) to treat ten litres of cooling system capacity.
With the radiator cap off and a garden hose in hand, fill the cooling system with water while tapping the required amount of powder into the stream of water.
Continue filling the cooling system after adding the Optimiser Powder until it reaches full capacity. Once filled, securely replace the radiator cap. If additional water is required, top up the system through the expansion tank and ensure the cap is replaced securely as well. However, if the vehicle only has a cap on the expansion bottle and not on the radiator use the method below;
Optimiser Powder Application for Vehicles with Expansion Bottle Caps and No Radiator Cap.
For vehicles equipped with a radiator cap, administer the Optimiser Powder directly through the radiator.
If the vehicle is equipped solely with a cap on the expansion bottle and lacks one on the radiator, it is advisable to avoid introducing the Optimiser Powder through the expansion bottle. This is because the Optimiser Powder may not readily disperse into the cooling system through this method.
To effectively introduce the Optimiser Powder into the cooling system, begin by disconnecting the top radiator hose from the radiator, leaving it connected to the engine. Hold the disconnected radiator hose in a vertical position, and with a garden hose in hand, commence filling the cooling system with water. Simultaneously, dispense the required amount of powder into the radiator hose using the stream of water from the garden hose to ensure even distribution.
As the cooling system approaches full capacity, reconnect the radiator hose back onto the radiator. Finally, complete the process by topping up the cooling system through the expansion bottle. This method guarantees a thorough and effective introduction of the Optimiser Powder into the vehicle’s cooling system, particularly in cases where there is no cap on the radiator.
Start the Engine:
Start the vehicle and allow the engine to idle until it reaches normal running temperature (around 85°C or the centre on your temperature gauge). Once the thermostat opens and the radiator water, containing the Liquid Intelligence 245 solution and Optimizer Powder begins to circulate, replace the radiator caps securely while the engine is still idling.
Next, allow the engine to run for an additional 20 minutes at idle to facilitate the build-up of vapor pressure in the cooling system. The combination of elevated vapor pressure and heat will efficiently propel the water and sealing additives into the breach. Given that breaches are typically situated above or around a combustion chamber, the internal temperature within the breach will have surpassed 100°C at this point. This leads to the evaporation of the water content inside the breach, leaving the concentrated chemicals behind. The resulting heat and pressure chemical reaction transforms that solution into a solid seal, effectively plugging the breach.
Check for Bubbling:
After the engine has cooled down, inspect the radiator for any signs of bubbling. If no bubbling is evident, it is likely that the breach has been successfully repaired.
In the case of reduced but lingering bubbling, repeat the process until the bubbling ceases entirely.
Drive and Monitor:
After successfully completing the repair, resume driving the car as usual. Monitor the symptoms for a week or more to ensure they do not reoccur.
Once confident in the repair, perform a thorough flush to remove Liquid Intelligence 245 solution and Optimiser Powder from the cooling system.
Reintroduce Coolant:
Reintroduce the coolant into the cooling system. Please note: it’s crucial not to rush the removal of the sealing additives; allow sufficient time for a thorough evaluation of the repair’s success. A few weeks of regular driving without the recurrence of symptoms serves as a strong indicator of a long-term successful repair.
Which Coolant Will Give You the Best Chance of Maintaining Your Head Gasket Repair?
Many people suspect that their head gasket damage is a result of overheating, which can be the case. However, it’s often a consequence of years of neglect in the cooling system, especially if the vehicle has been using only water or low glycol coolants for an extended period. Low or no glycol coolants can lead to cavitation erosion and corrosion, gradually eroding and compromising the integrity of the head gasket. This erosion allows combustion gas to leak into the cooling system, resulting in overheating issues.
Liquid Intelligence 245 Blown Head Gasket Solution is designed to repair such damage. However, without x-ray vision, it’s impossible to rule out the presence of additional damage in other areas of the head gasket. Consequently, it’s quite common to experience the development of another head gasket breach shortly after fixing one.
To address this, we strongly recommend considering the use of our Liquid Intelligence 500 Coolant after repairing the head gasket breach. Specifically formulated to eliminate cavitation erosion, this coolant’s unique attributes prevent other areas with head gasket damage from worsening and causing future problems. It becomes an essential component of the cooling system’s long-term restoration, enhancing the longevity of the 245-repair for years to come.